We use cookies for personalizing content and ads and providing social media features. Your usage information on our website will be used for social media, advertising, and traffic analytics, or shared with our partners. Clicking "Accept" means you agree to use our cookies .
Have you noticed that the password-protected user accounts on your Windows PC will not lock out after numerous failed logon attempts? No matter you've noted such a phenomenon or not, it is necessary for you to learn about how to realize account lockout after failed logon attempts. Meanwhile, the article mainly shows you how to unlock the locked account on Windows 10 computer.
Way 1: Set Account Lockout Attempts via Local Security Policy
Step 1: Open Administrative Tools.
Click the bottom-left Start button, type administrative in the empty search box and tap Administrative Tools.
Step 2: Open Local Security Policy.
In the Administrative Tools window, double-click Local Security Policy.
Step 3: Find and open the policy named "Account lockout threshold".
FYR, it is located in Account Policies/Account Lockout Policy.
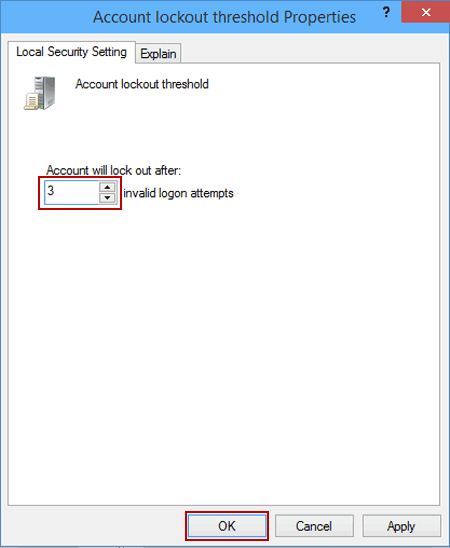
Step 4: Set the account lockout threshold.
In the policy's properties window, input a value between 0 and 999, and then click OK. For instance, if you want account to lock out after three invalid logon attempts, type 3 and tap OK.
Step 5: Accept the suggested value changes.
As the Suggested Value Changes dialog appears, choose OK.
After that, the encrypted user accounts on your PC will lock out after the number of times of failed logon attempts set by yourself.
Way 2: Set Account Lockout Attempts via Command Prompt
If you are skillful in command line, it is easy to set up account lockout attempts via command prompt.
Step 2: Execute the command to set the lockout threshold (e.g., 3 attempts): net accounts /lockoutthreshold:3.
Step 3: Define the lockout duration via command: (e.g., 15 minutes): net accounts /lockoutduration:15.
Step 4: Set the reset time for the failed attempts counter (e.g., 10 minutes): net accounts /lockoutwindow:10.
Step 5: Shutdown the command prompt and then account lockout attempts has been applied.
Way 3: Set Account Lockout Attempts via Group Policy Editor
If you are using Windows 10 Pro or Enterprise edition, the Group Policy Editor can help configure the account lockout attempts.
Step 1: Press Windows +R key to open Run box. After that, input gpedit.msc to run.
Step 2: Go to Computer Configuration > Windows Settings > Security Settings > Account Policies > Account Lockout Policy.
Step 3: Double-click Account lockout threshold option and define the number of failed attempts. Then, click the OK button.
Step 4: The Suggested Value Changes prompt comes. And hit the OK button to save the changes.
How to Unlock a Locked Account If You Are Locked out
If your account is locked out after too many failed login attempts, how can you unlock the locked account in Windows computer without the password? Don’t worry, iSunshare Windows Password Genius can be your best helper.
iSunshare Reliable Windows Password Remover
Unlock Windows account when locked out
Remove Windows screen password without data loss
Get into Windows PC without password when forgot it
Step 1: Get another workable Windows computer. Download and install iSunshare Windows Password Genius on the computer.
Step 2: Open the software and choose an option to create the password reset disk. The USB drive option is always chosen.
Step 3: Insert the USB drive into the computer and select it. After that, hit the Begin Burning to burn the reset disk.
Step 4: After the reset disk is created successfully, you can eject it and then insert it into the locked Windows computer. After that, set the computer to boot from the USB disk.
Step 5: After the computer is successfully boot, you can choose the locked account and hit the Reset Passwordbutton. In no time, the account password is removed. Now you can eject the USB disk and boot the computer normally.
FAQs about Account Lockout Attempts
Q1: How many attempts you can try before your account is locked?
By default, Windows does not lock accounts after failed attempts. If you set the account lockout attempts to 3 or 5, the account will be locked after 3 or 5 attempts.
Q2: What happens when an account is locked?
The user will be unable to log in until the lockout duration expires or an administrator unlocks the account.
Q3: How long does Windows 10 lock you out for wrong password?
It depends on the account lockout duration you set. Generally, it will be 10 minutes.
Conclusions:
By following these methods, you can easily configure account lockout settings in Windows 10, improving your system’s security and protecting it from unauthorized access.