“I am a photography lover so there are a great number of photos stored on my laptop. I got used to saving beautiful images from some professional websites. Now I want to sort out those images and delete all duplicate images on Windows. How can I do that?”
There is no doubt that the duplicate photos occupy the space of your computer, which will make Windows run slower. In this article, you can learn the tutorial about how to find and delete duplicate photos in Windows 10/11.
- Way 1: Find and Delete Duplicate Photos in Windows 10/11 Free in File Explorer
- Way 2: Scan and Eliminate Duplicate Photos via Windows PowerShell
- Way 3: Clean up Duplicate Photos in Windows 10/11 by iSunshare DupFiles Genius
Way 1: Find and Delete Duplicate Photos in Windows 10/11 Free in File Explorer
File Explorer, also called Windows Explorer, can help you to find and remove duplicate photos on Windows 10/11 without software. It is one of the easiest ways to delete duplicate pictures/photos/images manually.
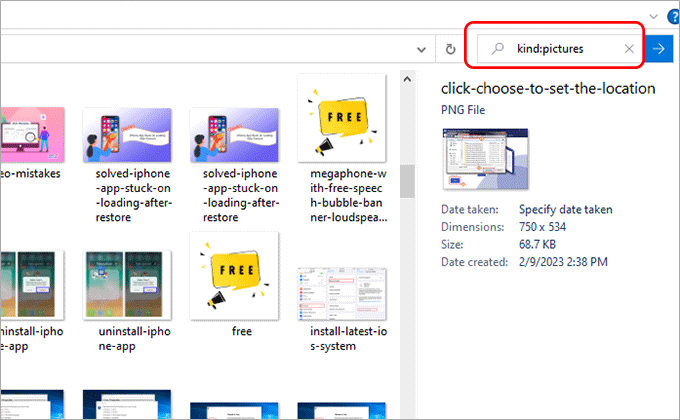
Step 1: On your Windows computer, open File Explorer. Then go to where the duplicate photos are stored. In the search box, enter kind: pictures to make all pictures organized and orderly.
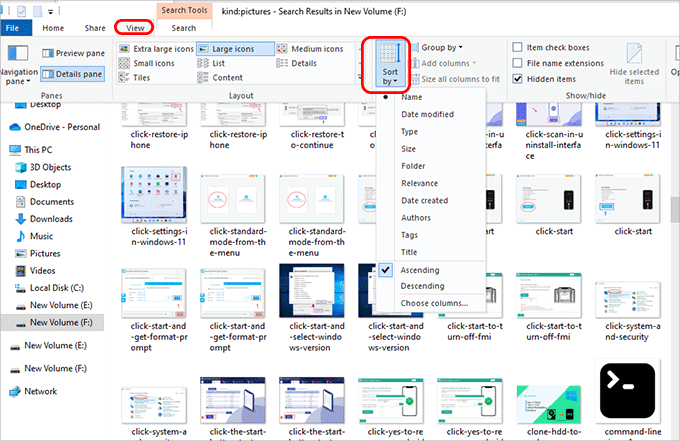
Step 2: All photos are listed here. You can click the View option on the top to change the view mode. It is also possible for you to sort all photos out by Name if needed.
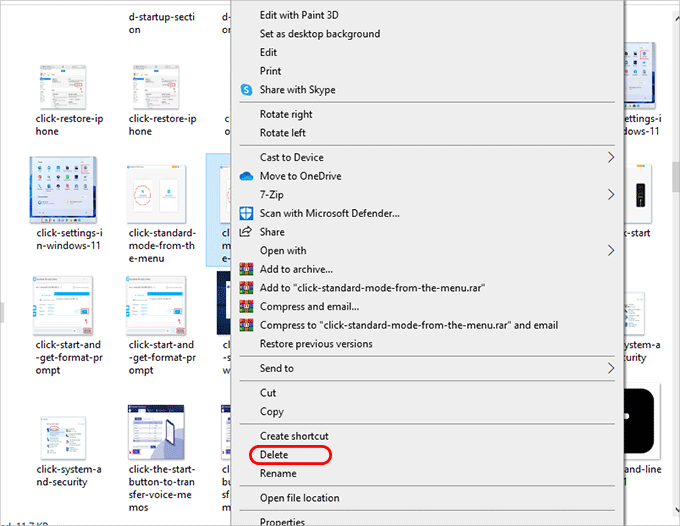
Step 3: Scroll down to identify duplicate photos individually. For the unwanted duplicate photos, you can right-click and then select Delete to remove them from your computer. This is a simple but boring process to find and remove duplicate ones repeatedly.
Way 2: Scan and Eliminate Duplicate Photos via Windows PowerShell
It will be more effective to scan and eliminate duplicate files using PowerShell. You just need to execute the command lines and then get all duplicated photos/pictures/images removed. But you should know the image file types in advance. If you don’t know about it, you can try other methods listed in this article.
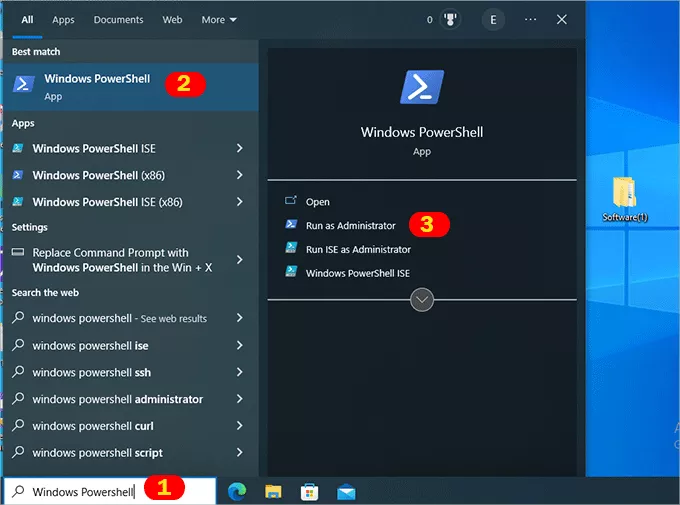
Step 1: Enter Windows PowerShell on the Windows search box and then select Windows PowerShell to run as administrator.
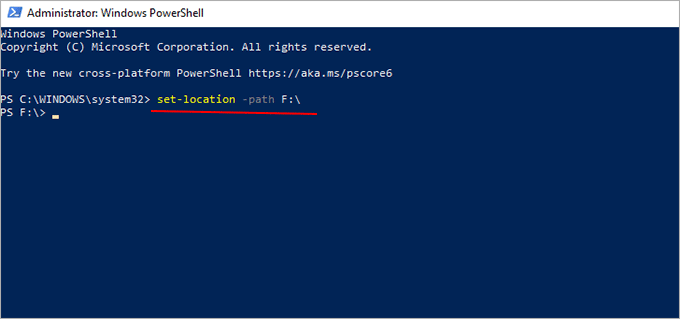
Step 2: Execute the command to set the location to look for duplicate files: set-location –path Your Folder/Drive Path. For example, if you want to find duplicate files on F drive, you need to enter the command: set-location –path F:\.
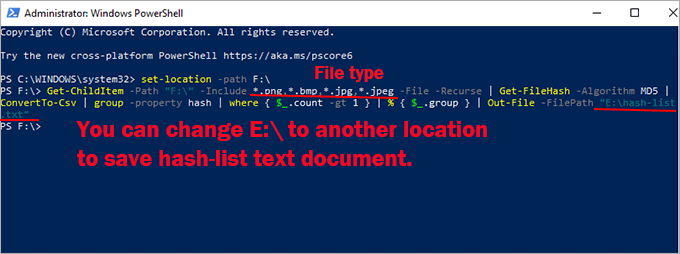
Step 3: Execute the following command to find duplicate photos:
Get-ChildItem -Path “F:\” -Include *.png,*.bmp,*.jpg,*.jpeg -File -Recurse | Get-FileHash -Algorithm MD5 | ConvertTo-Csv | group -property hash | where { $_.count -gt 1 } | % { $_.group } | Out-File -FilePath “E:\hash-list.txt”
Note:
- You can add more image file types to search for, such as SVG and RAW.
- E:\hash-list.txt can be changed to any location to store the generated hash-list.txt. You cannot store it in the same path as your duplicate photos.
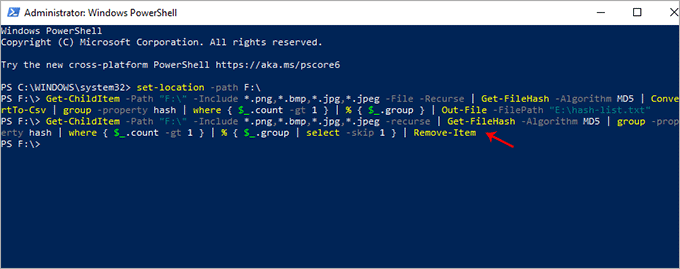
Step 4: Wait for minutes and then input the commands to delete the duplicate photos automatically:
Get-ChildItem -Path “F:\” -Include *.png,*.bmp,*.jpg,*.jpeg -recurse | Get-FileHash -Algorithm MD5 | group -property hash | where { $_.count -gt 1 } | % { $_.group | select -skip 1 } | Remove-Item
Finally, you can go to your path to check whether the duplicate photos are deleted or not.
Way 3: Clean up Duplicate Photos in Windows 10/11 by iSunshare DupFiles Genius
Is there any easy and safe way to delete duplicate photos in Windows 10 or Windows 11 without using command lines? Yes, you can use the reliable duplicate photo finder and cleaner to make it done. iSunshare DupFiles Genius is a perfect choice to automatically scan and identify duplicate photos on a Windows computer. This software can smartly find out duplicate photos with different names in different folders.
Why choose iSunshare DupFiles Genius?
- Scan one or more locations for duplicates at a time
- Detect and delete duplicate videos, audio, archives, etc. files.
- Offer the exclude option to protect private folders.
- Cover various file types to scan and delete.
- One-click to select all duplicate files to delete.
- Users can customize the scan type and scan settings.
- Available to skip hidden files and system files.
- Works on Windows 11/10/8/8.1/7 computers.
Step 1: Get iSunshare DupFiles Genius on your computer and then launch it. If you do not have one, download and install it from the iSunshare official website.
Step 2: Click the plus icon to add folders or drives to scan. Then, click on Next.
Step 3: Check only the Picture option and click Start scanning. You can also check other scan options according to your needs.
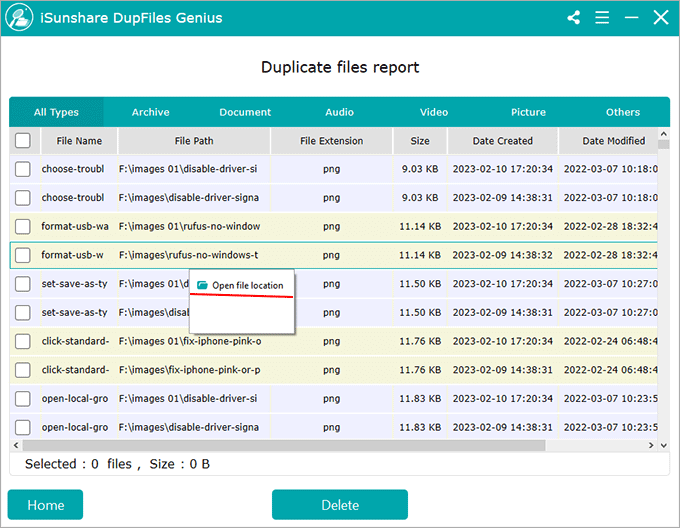
Step 4: After scanning, you can get a duplicate files report with all photo details: name, path, file extension, size, date created, date modified, and date accessed. If you want to preview the image, right-click it and choose the Open file location option.
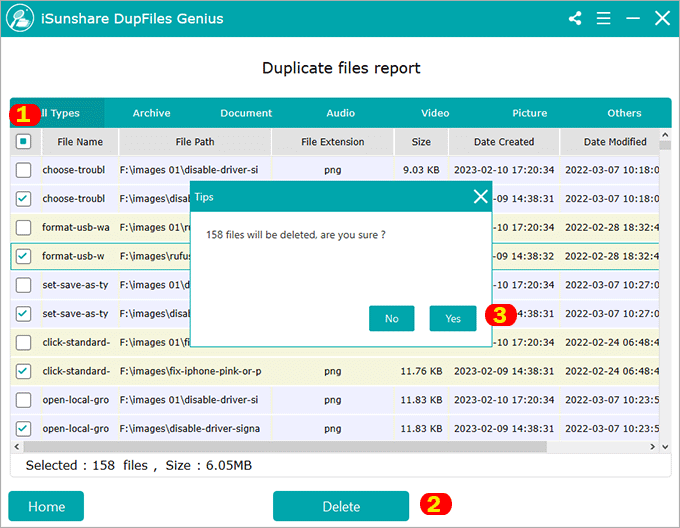
To remove all duplicate photos, you need to simply click on the first checkbox and all duplicate photos will be chosen. Now, go to click the Delete button and confirm it.
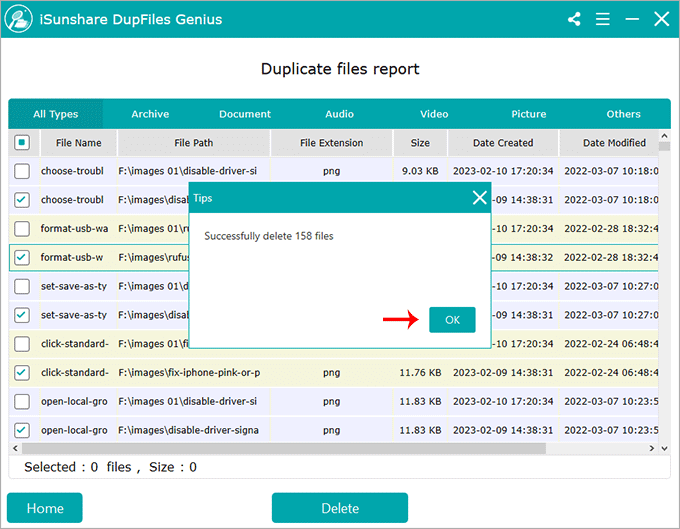
Step 5: Soon, the duplicate photos will be removed from your computer completely and permanently.
Conclusions:
For the small photo collections, you can manually delete them with File Explorer. If you are tech-savvy, you can utilize the command lines to find and delete duplicate photos. When it comes to large photo collections in different locations, you can take advantage of iSunshare DupFiles Genius to quickly remove duplicates. This software is reliable with an easy-to-use interface. Everyone can get rid of duplicate photos in minutes.
Related Articles:
