A macro is a shortcut to something you do a lot. It saves time on tasks you do often, but it asks for bundling the steps into a macro. So first we need to record or create the macro. Then we can run the macro by clicking a button or pressing a combination of keys. It depends on how we set it up. Now let’s see how we are going to create a simple Word 2010 macro.
How to create a Macro in Word 2010
Step 1: Click View in Microsoft Word 2010 menu, and click Macros > Record Macro in Quick Access Toolbar.
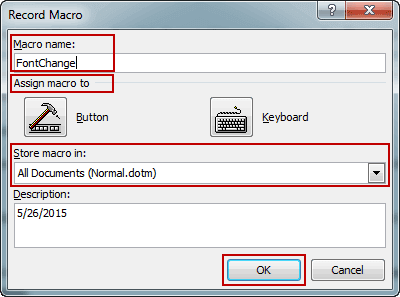
Step 2: When you click on Record Macro, you get the Record Macro dialog box popping up. It looks like below.
There are four areas in the Record Macro dialog box, Macro name, Assign Macro to, Store Macro in and Description.
The first thing is to give your new Macro a name. Macro name is set Macro1 or Macro2 etc by default. But it is not descriptive for what we want our macro to do. So we should call our macro a specified name, which can clearly show what the macro can do. For example, if you want to create a macro to change text font in Word document, you can name it FontChange.
In the section Assign Macro to, you can give the choice either Button or Keyboard for the way to record and run macro.
Store macro in points out which Word document the macro will apply to. When you choose All Documents (Normal.dotm), the macro you are going to record will be available to all the new Word documents created in future. While you choose MS Word (document), it will be only used in this Word document.
In Description part, you are free to set anything you like. So if there is something you cannot describe macro in other parts, write them in this part.
Step 3: Click OK in Record Macro dialog to begin recording a macro.
Step 4: When you return to your Word document, you would find your mouse pointer becomes different.
Tips: If you have chosen “Button” in Step 2 “Assign Macro to” section, now click View, and point to Macros down arrow, you can see Stop Recording and Pause Recording options. The macro being recorded can be easily stopped or paused with them.
Step 5: After you have done what you want to record, click Stop Recording. Now a macro for Word 2010 document has been successfully created.
If you have made macro applied to all documents, now you can run the macro and apply it to other documents in Word 2010.
How to run Macro in Word 2010 new document?
1. Open Word document you would like to do something with Macro on document quickly.
2. Click View – Macros.
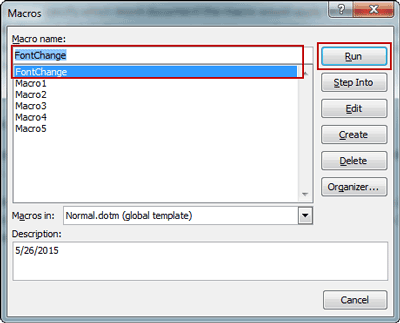
3. Macros dialog appears, and several available Macros are listed in the dialog box.
4. Select part of Word document you want macro applies to, and choose the appropriate macro in Macros dialog. Then click Run button at the top right side.
Tips: If the macro is available to all Word document, it won’t be necessary to specify any part of Word document before running macro.
At last, there is one more thing worth mentioning. If macro has applied to Word template, and you create new document with template normal.dotx, then run this new macro in new document would not be necessary.
Related Articles:


